Account Settings
Customize your interface, manage tokens, secure your account, and configure integrations all in one place
Table of Contents
Settings Overview
Open Settings from the bottom of the left sidebar by clicking Settings. Settings are organized into eleven tabs in the left panel:
- Profile — Personal info, custom intro prompt, and password
- Appearance — Theme, timestamps, chat width, and display toggles
- Chat Defaults — Default model, temperature, persona, and datasets
- Security — MFA, CAC/Smart Card, and YubiKey registration
- API Keys — Create and manage API keys
- Usage & Billing — Token usage and subscription plan
- MCP Servers — Add and manage Model Context Protocol servers
- Integrations — Connect Google, GitHub, and Microsoft accounts
- Data & Privacy — Review recent login history and jump to your prompt logs
- Widgets — Opens the embeddable Widgets configuration page
- Prompt Logs — Opens your prompt/response log history
Profile
Update your personal details including First Name, Last Name, Company, and Phone. Your email address is displayed but cannot be changed directly.
Custom Intro Prompt
The Custom Intro Prompt field (800 character limit) is added to the system prompt of every chat to personalize responses — tone, role, and preferences. It is saved to your account and applied to all new and existing conversations until you change or clear it.
Change Password
Scroll down within the Profile tab to access the Change Password section and update your account password.
Appearance
Chat Defaults
Chat Defaults set the starting configuration applied to every new conversation. Individual settings can still be overridden per-chat from the chat toolbar.
Default Model
The AI model used for new conversations. Select from all available models in the dropdown
Temperature
Controls randomness. Slide toward Precise for focused outputs or Creative for more varied responses
Security
The Security tab lets you register additional authentication methods to protect your account. Three options are available:
Multi-Factor Authentication (MFA)
Add an extra layer of security with a time-based one-time password (TOTP). Click Setup MFA and use an authenticator app such as Microsoft Authenticator or Google Authenticator
API Keys
Generate and manage API keys for authenticating with the Ask Sage API. Enter a name in the Enter API key name... field, optionally restrict it to one or more scopes, and click + Create Key to generate a new key.
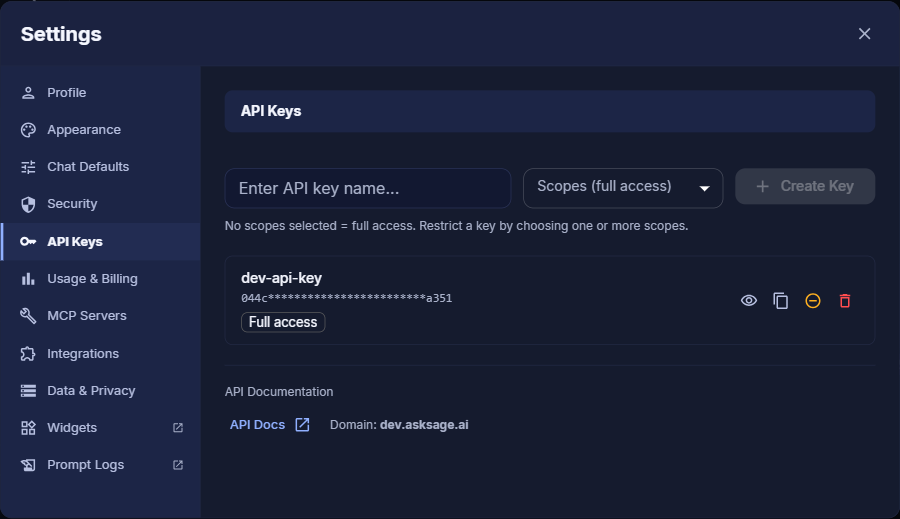
Each key in the list shows a masked value and four action icons:
- Show — Reveal the full key value
- Copy — Copy the key to clipboard
- Revoke — Disable the key without deleting it
- Delete — Permanently remove the key
API Key Scopes
By default, a new key has full access to the Ask Sage API. To limit what a key can do, select one or more scopes before creating it — the key will only be able to call endpoints covered by the selected scopes.
| Scope | Grants access to |
|---|---|
query | Core chat and completion endpoints, such as /query and /query_with_file |
plugins | Plugin discovery and execution endpoints, such as /get-plugins and /execute-plugin |
mcp | MCP server management endpoints, such as adding, listing, and removing MCP servers |
passthrough | Ask Sage's OpenAI/Anthropic-compatible passthrough proxy, used when configuring Ask Sage as a custom model provider in third-party tools |
agent_builder | Triggering Agent Builder workflows programmatically via POST /execute-agent |
Usage & Billing
The Usage & Billing tab shows your current subscription plan, token reset date, and real-time token consumption with progress bars for each token type.
Current Plan
Displays your active subscription (e.g., enterprise) and the next token reset date. Click Manage Subscription to update your plan
MCP Servers
The MCP Servers tab is where you add and manage Model Context Protocol servers that extend the AI with external tools and data sources. Click + Add Server to configure a new MCP connection.
Integrations
Connect external accounts to access files and services directly within Ask Sage. Click Connect next to any integration to authorize it:
Data & Privacy
Recent Logins
A log of your recent login activity, showing the Date & Time, Status (Success or failure), and a Comment column for each login event. Use this to monitor for unexpected access to your account.
A View Prompt Logs button at the bottom of the panel links to your prompt/response log history (see Prompt Logs below).
Widgets
Prompt Logs
You now have a complete overview of the Ask Sage Settings panel — from personalizing your profile and appearance, to securing your account, managing API keys, monitoring token usage, and connecting external integrations.