Appliance Kit Setup
Unpack, connect the cables, and start your first local conversation
Table of Contents
About this guide
This guide walks through unpacking and starting a preinstalled appliance kit. Allow about 10 minutes to connect it, then up to about 15 minutes for the first startup while services and the included model load. No software download, internet connection, monitor, or keyboard is needed for normal use.
The illustrations show one supplied portable kit with two units, a switch, and a router. Port numbers, cable colors, accessories, and startup order refer to that example. Use the labels and handover instructions supplied with your own kit; Edge platforms can have different hardware and node counts.
Before you unpack
Have a laptop, tablet, or phone with a browser, access to the appliance network, and the credential card supplied with the kit. Provide an outlet for each unit and power for the switch and router you will use.
Check the contents against your packing list. The illustrated kit includes:
| Item | Purpose |
|---|---|
| Appliance units | Run Ask Sage and its local models. Use the number configured for your deployment. |
| Supplied power adapters and cables | One set for each unit, plus power for the network equipment. |
| Network switch | Connects the units to the same network. |
| Router | Provides the kit network and Wi-Fi when you are not using an existing site network. |
| Blue network cables | Connect each unit’s Network port to the switch. |
| Green interconnect cable | Connects the Link ports directly between the illustrated pair. |
| Grey uplink cable | Connects the switch to the supplied router. |
| Optional USB-C monitor | Supports local administration or recovery; regular users connect through a browser. |
| Credential card | Contains the initial sign-in details and, where provided, Wi-Fi information. |
Keep the credential card with your organization’s protected credentials. Use the supplied power adapters and cables: a similar-looking USB-C cable may deliver insufficient power and cause slow operation or failure to start. Contact support if a supplied adapter or cable needs replacement.
Identify the ports
Match the marked ports to the cables before connecting power. These numbers describe the illustrated unit.
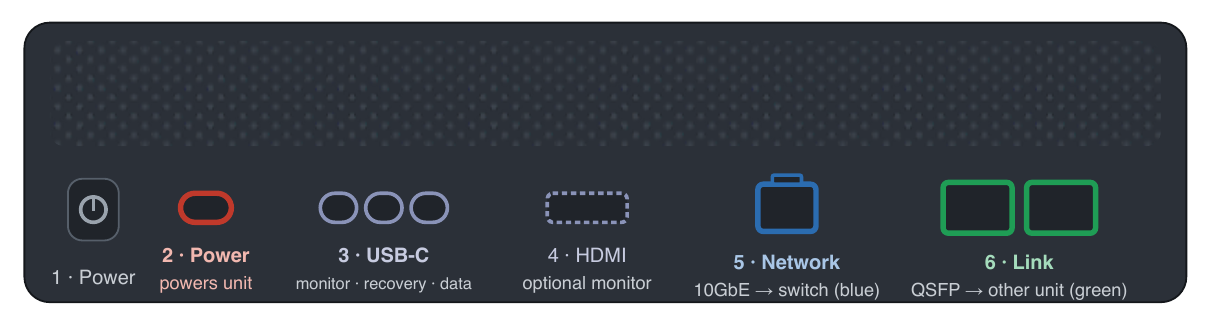
| Label | Connection |
|---|---|
| 1 · Power | Power button used to start the unit. |
| 2 · Power | Dedicated USB-C power input for the supplied adapter. |
| 3 · USB-C | Optional monitor, recovery, or data connections. |
| 4 · HDMI | Optional display connection. |
| 5 · Network | Blue network cable to a 10GbE port on the switch. |
| 6 · Link | Green QSFP interconnect to the other unit, when configured as a pair. |
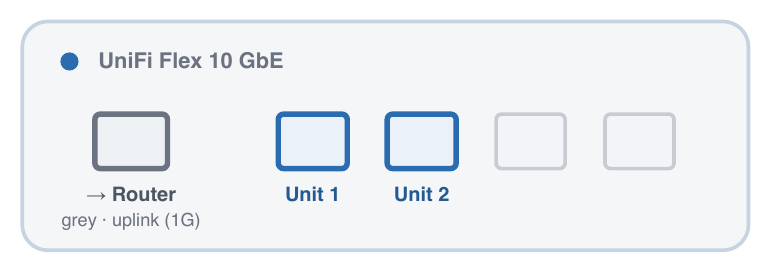
On the illustrated switch, use the marked Unit 1 and Unit 2 10GbE ports for the blue cables. The grey cable connects the marked Router uplink to the router. The switch has its own power adapter.
Connect the kit
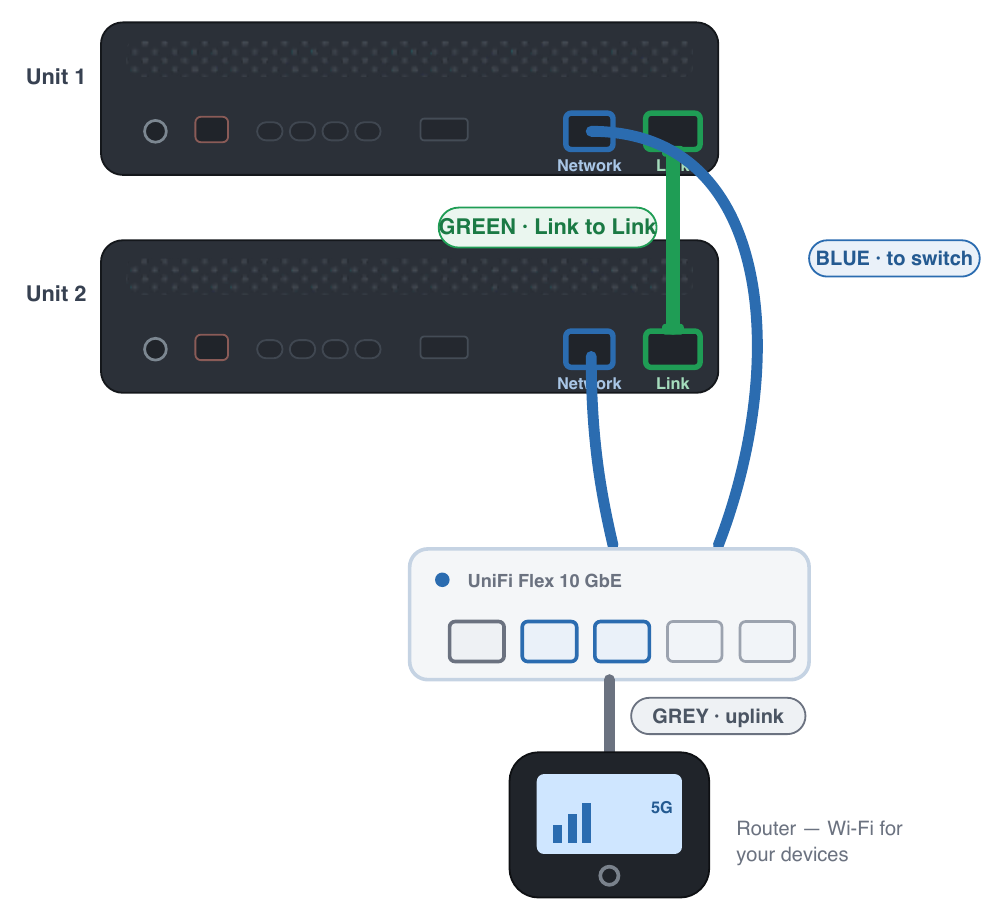
- Place the units. Use a hard, flat surface with clear space around the vents. Avoid carpet, cloth, or a closed cabinet.
- Connect the network. Run a blue cable from each unit’s Network port to the switch. Connect the switch to the approved site network, or use the grey uplink to the supplied router for the kit network.
- Link the pair. If your kit is configured as the illustrated pair, connect the green cable directly between the two Link ports. Follow your supplied port labels for the interconnect.
- Connect power. Attach each unit’s supplied power adapter to its dedicated power input and an outlet. Connect power to the switch and, if used, the router.
The green interconnect goes directly from unit to unit, never into the switch. The blue network cables provide each unit’s connection to the switch. Keep both types connected for a kit configured to use them.
Have the switch and router running, with the network cables connected, before starting the units.
Power on and sign in
-
Start the units in order. For the illustrated pair, press the power button on unit 1, allow it to finish starting, then start unit 2. Follow the supplied startup order if your kit differs.
-
Allow startup to complete. Services start automatically. First startup can take up to about 15 minutes while the included model loads, and pages can be temporarily unreachable. No local login or commands are needed.
-
Connect your browser device. Join the supplied router’s Wi-Fi using the actual QR code on the router or credential card. If your device already has a wired connection to the appliance network, skip Wi-Fi. An internet connection is not required.
-
Open Ask Sage. Visit https://chat.edge.asksage.ai, or your assigned workspace address. Sign in using the credential card and follow the first-sign-in prompt to choose a new password that meets your organization’s policy.
Select an available local model and send a short chat message. Then complete the administrator acceptance check to verify the expected nodes, services, and document processing.
Keep network cables connected during startup. If the kit was started without its network connection, reconnect it and use the supplied restart procedure. Use a graceful shutdown when the Manager is reachable; if it is unavailable, follow the supplied console procedure or contact support.
Bookmark the kit addresses
These addresses belong to the kit described in the supplied setup guide. Your handover record takes precedence if your deployment uses different names or protocols. Connect to the appliance network before opening them.
| Service | Example kit address | Who uses it |
|---|---|---|
| Ask Sage workspace | https://chat.edge.asksage.ai | Everyone, for chat and documents. |
| Local documentation | https://docs.edge.asksage.ai | Everyone; this copy is served from the appliance and works offline. |
| Appliance Manager | http://appliance.asksage.local:11100 | Authorized operators and administrators. |
The example kit’s direct Manager address uses HTTP on port 11100. Use the exact Manager address and protocol provided for your deployment. Workspace and Manager accounts are separate; see Users and settings.
Where workspace self-registration is enabled, additional users can create an account from the workspace sign-in page. Otherwise, follow your organization’s provisioning process. The Manager’s Users tab manages access to the administration console.
Kits configured for a single unit
If your kit was supplied or configured for standalone use, connect that unit’s blue Network cable to the switch and connect the switch to the router or site network. Leave the green interconnect unused, connect the supplied power adapter, and start the unit. Sign-in and everyday workspace use follow the same steps above.
A single unit has less model capacity than the illustrated pair and cannot serve models configured to require both units. Keep all required nodes running in an existing multi-node deployment. Contact your deployment team before removing a node, using it as a spare, or adding another unit; those changes can require cluster and model configuration.
Shut down and restart safely
- Have an authorized administrator open the Appliance Manager.
- Select Shut down appliance and confirm the action. On the illustrated paired kit, the shutdown initiated through unit 1 shuts down both units.
- Wait for shutdown to finish and the units’ power lights to go out before unplugging power or packing the kit.
Do not unplug running units to turn them off; interrupted writes can damage stored data. For another hardware configuration, follow its documented shutdown indicators and procedure.
To use the kit again, reconnect the network and power, then follow the power-on sequence. Ask Sage starts automatically.
If the kit does not start as expected
| What you see | What to check |
|---|---|
| Page will not load just after power-on | Allow up to about 15 minutes for first startup. Keep the network equipment and required units powered. |
| Page still will not load | Check both ends of each blue cable, switch/router power, your device’s network, and the assigned address. Use the supplied restart procedure if the kit booted without its network. |
| Unit does not start or performs poorly | Check the supplied adapter and power cable are connected to the dedicated power input. |
| Fans are loud or the unit is warm | Fan activity and warmth can be normal under load. Confirm vents are clear and the unit is on a hard surface with ventilation. |
| Initial sign-in is rejected | Passwords are case-sensitive. If the initial password has already been changed, use the current password or contact your administrator. |
| Credential card or password is lost | Contact the administrator or Ask Sage support for the approved access recovery process. |
| Responses are slow on a paired kit | Confirm both required units are powered and the green interconnect is connected, then check model readiness in the Manager. |
For further diagnosis, use Edge troubleshooting. Have the appliance serial number and installed version ready for support; on the illustrated unit, the serial label is underneath the hardware.