First Workflow Tutorial
Build your first AI workflow in minutes
Table of Contents
Accessing the Agent Builder
To access the Agent Builder feature:

Agent Builder option in the sidebar
Understanding the Interface
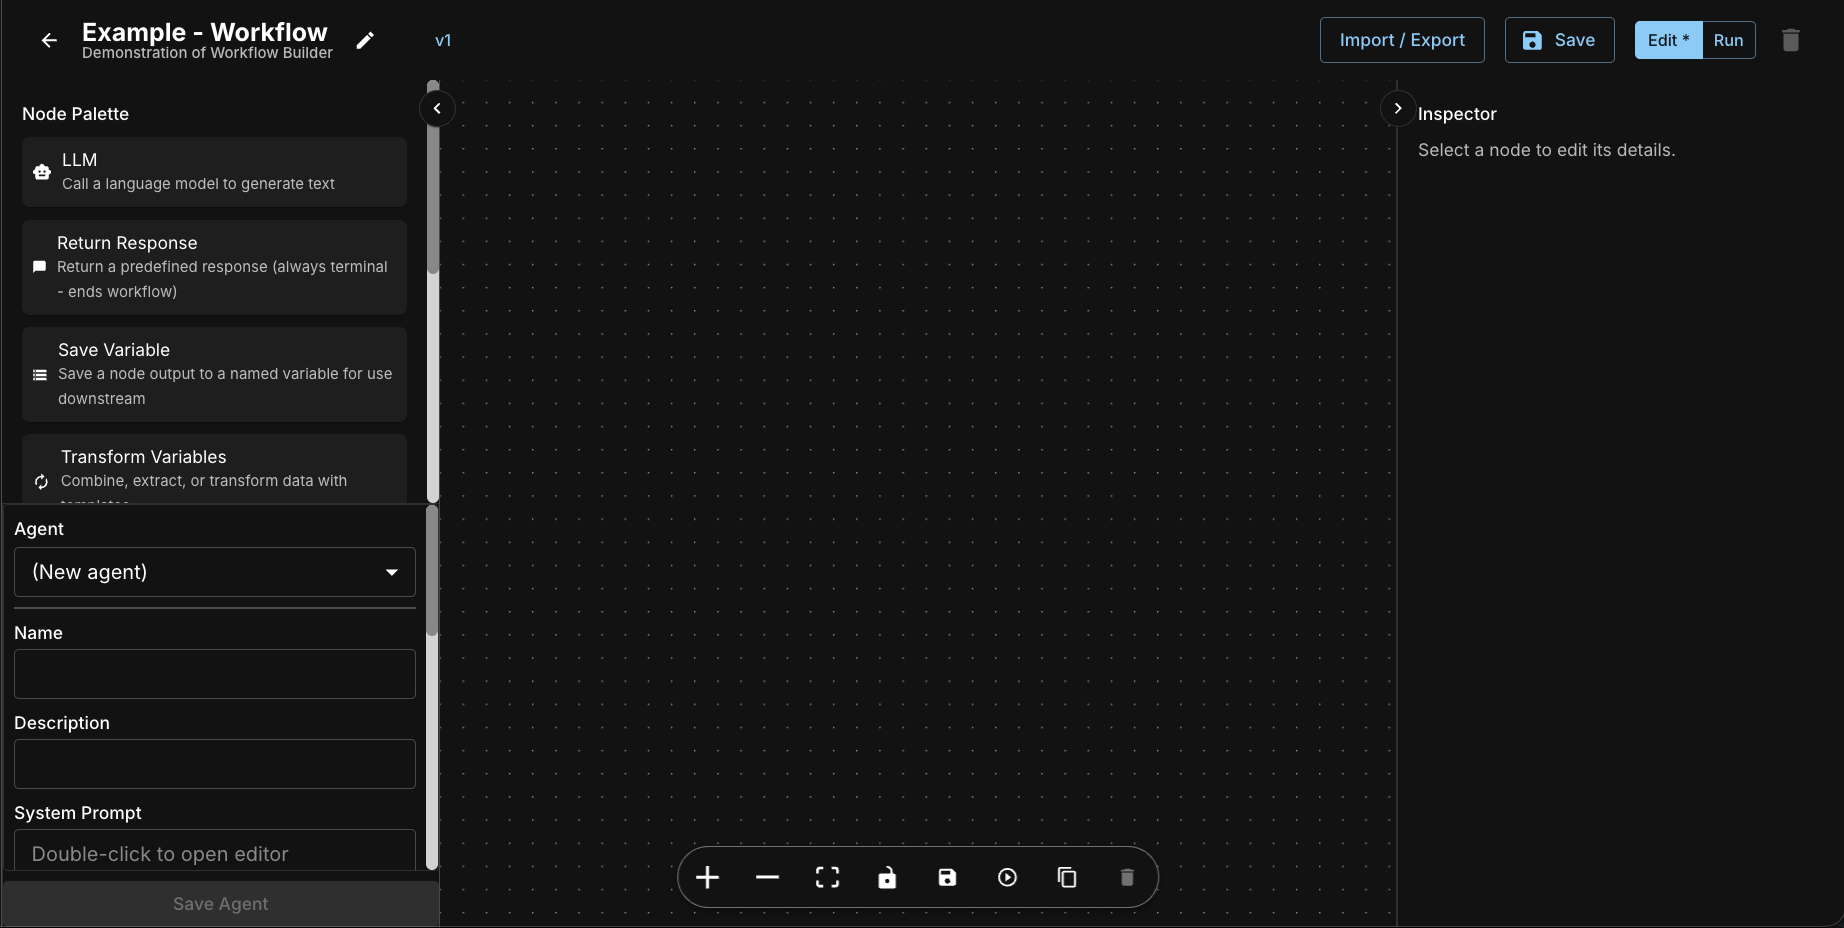
Creating Your First Workflow
Let's create an RFP/RFI Analysis workflow that extracts key information from solicitation documents and generates a comprehensive response plan:

Click the New Workflow button to get started
Step 1: Create a New Workflow
- Click the "New Workflow" button in the dashboard
- Give your workflow a descriptive name (for this tutorial, we'll use "RFP-RFI Analysis and Response Plan")
- Add a description: "This is a comprehensive AI-powered workflow designed to analyze Request for Proposal (RFP) or Request for Information (RFI) documents and generate a structured response plan."
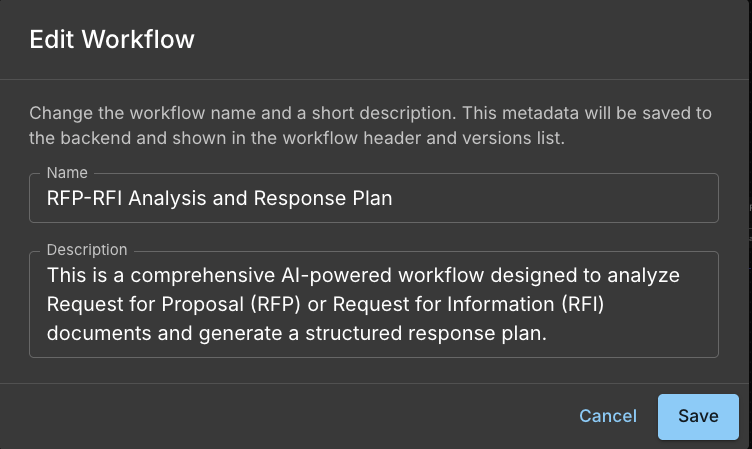
Enter the workflow name and description
Step 2: Add the First LLM Node for Data Extraction
- From the Node Palette, locate and drag an "LLM" node onto the canvas
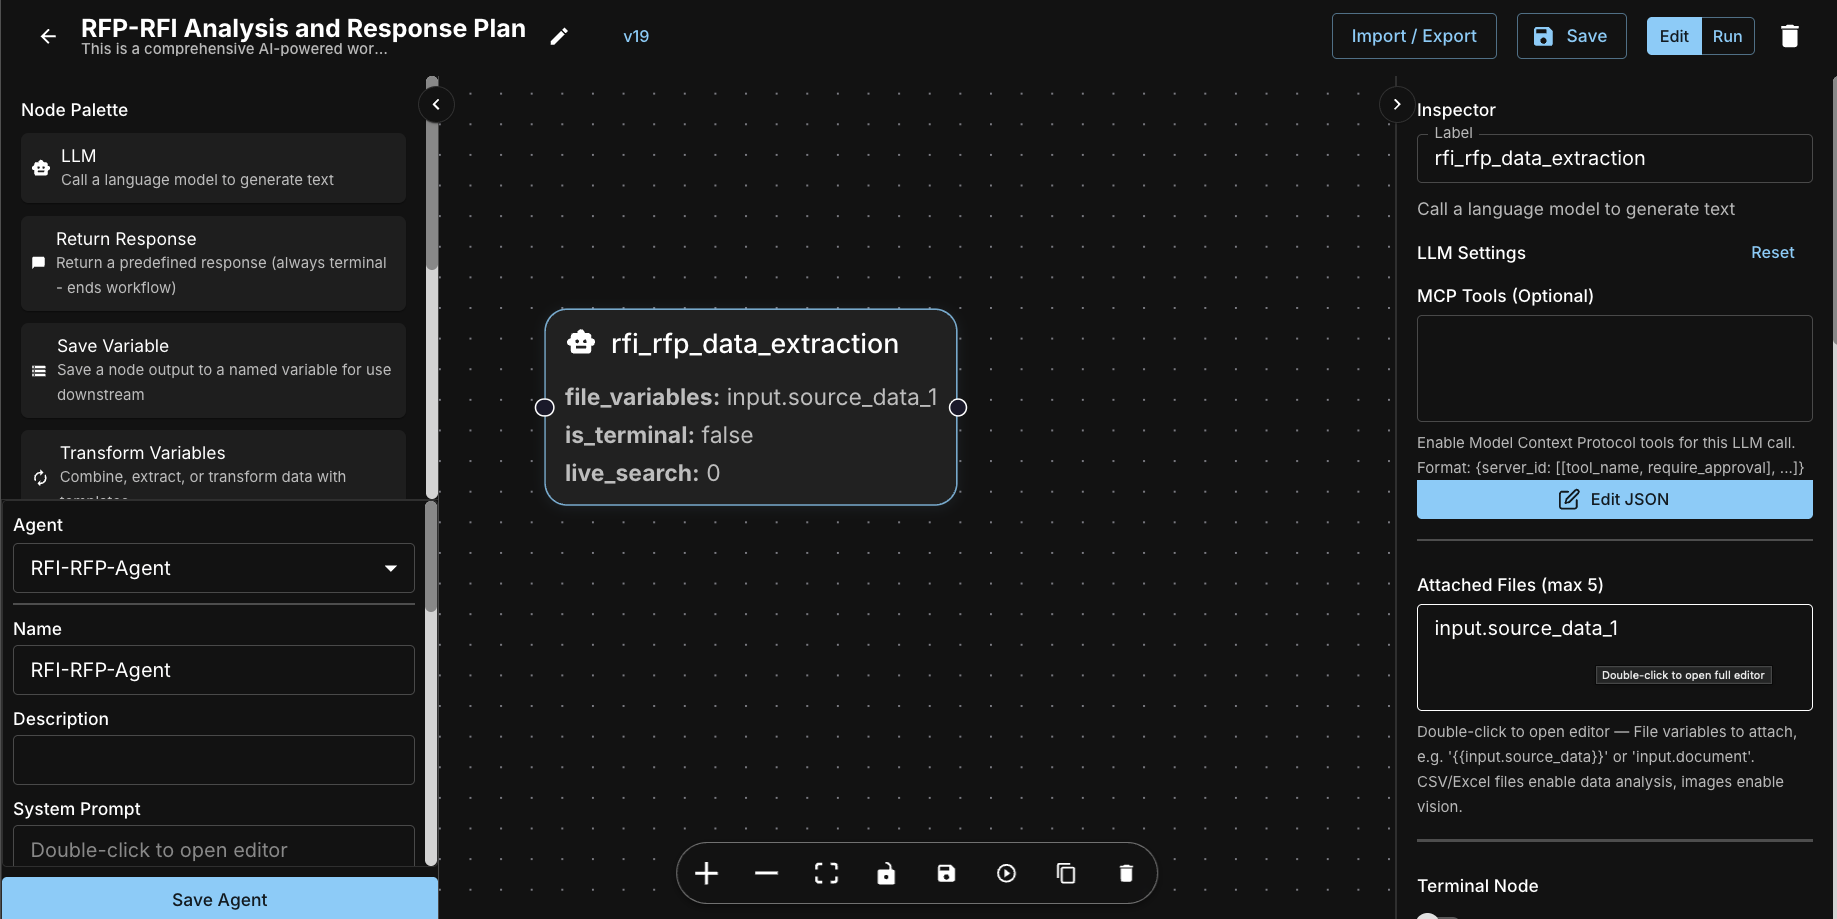
The right side panel is where you configure the settings for the node you are working on
- Label it "rfi_rfp_data_extraction"
- Set the model to "GPT-4.1-mini" and temperature to 0.2 for consistent extraction
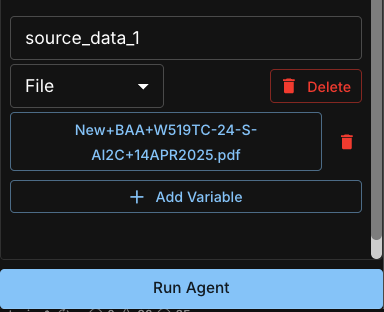
- In the Attached Files (max 5) section, configure "input.source_data_1" to accept the input document
- Enter the following prompt template:
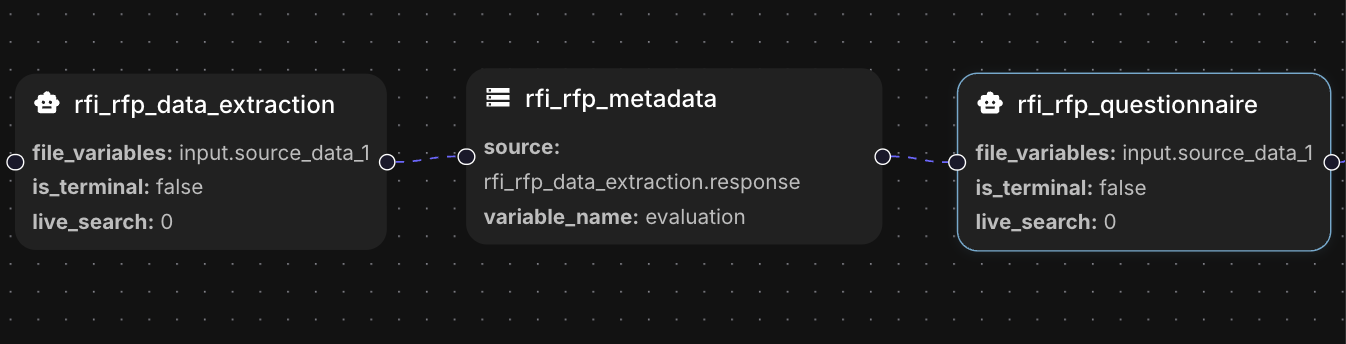
Step 3: Add a Save Variable Node
- Drag a "Save Variable" node onto the canvas to the right of the first LLM node
- Label it "rfi_rfp_metadata"
- In the source field, enter "rfi_rfp_data_extraction.response"
- In the variable name field, enter "evaluation"
- Connect the output of the first LLM node to the input of this Save Variable node
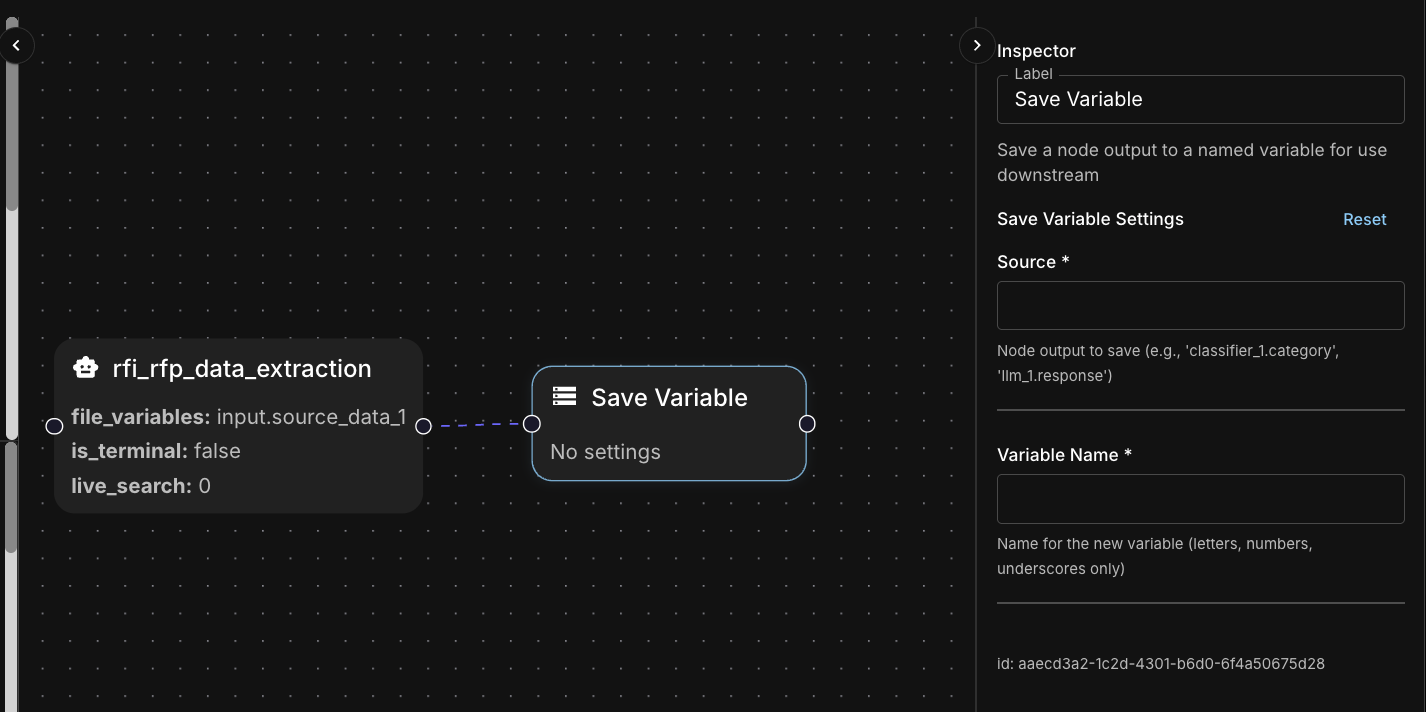
Save Variable node storing the extraction results
Step 4: Add a Second LLM Node for Questionnaire Analysis
- Add another "LLM" node and label it "rfi_rfp_questionnaire"
- Set the model to "GPT-4.1-mini" and temperature to 0.2
- In the Attached Files (max 5) section, configure "input.source_data_1"
- Connect the output of "rfi_rfp_metadata" to this node's input
- Enter the following prompt template:
Second LLM node configured for questionnaire analysis
Step 5: Add Another Save Variable Node
- Add a "Save Variable" node labeled "rfi_rfp_analysis"
- In the source field, enter "rfi_rfp_questionnaire.response"
- Configure it to save the questionnaire response to a variable named "evaluation_questions"
- Connect the output from the questionnaire LLM node
Step 6: Add a Third LLM Node for Project Planning
- Add a third "LLM" node labeled "input.rfi_rfp_project_plan"
- Set the model to "google-claude-45-sonnet" for advanced planning capabilities
- Set temperature to 1 for more creative planning output
- In the Attached Files (max 5) section, configure "source_data_1"
- Connect it to receive input from the previous Save Variable node
- Enter the following prompt template:
{{evaluation}} and {{evaluation_questions}} at the end. These double curly braces reference data from earlier nodes, allowing the project plan to incorporate all previously extracted information. When you copy the prompt, these will be included correctly. Step 7: Add Final Save Variable
- Add a "Save Variable" node labeled "RFI_RFP_Response_Timeline"
- In the source field, enter "rfi_rfp_project_plan.response"
- Configure it to save the project plan response to a variable named "project_plan"
- Connect it to the project planning LLM node
Step 8: Add a Return Response Node
- From the Node Palette, drag a "Return Response" node onto the canvas
- Label it "Return Response"
- Configure the response template to output all three variables: {{evaluation}}, {{evaluation_questions}}, {{project_plan}}
- Connect it to the final Save Variable node to complete the workflow

Your completed workflow should look like this, with all nodes connected in sequence. The workflow is intentionally stacked vertically to make it clear and easy to see all components.
Creating Your First Agent
Now that your workflow is complete, you need to create an agent to execute it. An agent connects your workflow to a specific AI model and defines how users will interact with it.
Configure Your Agent
- Set the dropdown to (New agent)
- In the Name field, enter:
RFI-RFP-Agent - In the Model field, select:
GPT-4.1-mini - In the Temperature field, enter:
0 - Click the "+ Add Variable" button
- Change the type from "Text" to "File"
- Update the key from
Key_1tosource_data_1 - Click "Save" to save your agent configuration

Configure your new agent with the appropriate settings
Running Your Workflow
Once your workflow is built and your agent is configured, follow these steps to execute your workflow:
Step 1: Save Your Workflow
Before running your workflow, make sure all your changes are saved. Click the Save button to preserve your workflow configuration, node connections, and agent settings.
Step 2: Switch to Run Mode
To execute your workflow, you need to switch from Edit mode to Run mode. Click the mode toggle to change from Edit to Run. In Run mode, the left panel transforms into the agent execution interface where you can interact with your workflow.

Use the Save, Edit, and Run mode controls to manage your workflow execution
Step 3: Select Your Agent
Once in Run mode, ensure your agent is selected from the dropdown menu on the left side panel. If you just created your agent, it should already be selected. If you have multiple agents, choose the RFI-RFP-Agent that we configured earlier.

Select your agent from the dropdown menu on the left side panel
Step 4: Provide Input Data
Your workflow is configured to accept a file as input (the source_data_1 variable we set up). Click the Attach file button to upload an RFP or RFI document. This can be a PDF, Word document, or any text-based file containing solicitation information.
Step 5: Run the Agent
With your document attached, click the blue Run Agent button to execute the agent. The workflow will process through each node sequentially, extracting data, analyzing the questionnaire requirements, and generating a project plan.
Attach your document and click the run button to execute the agent
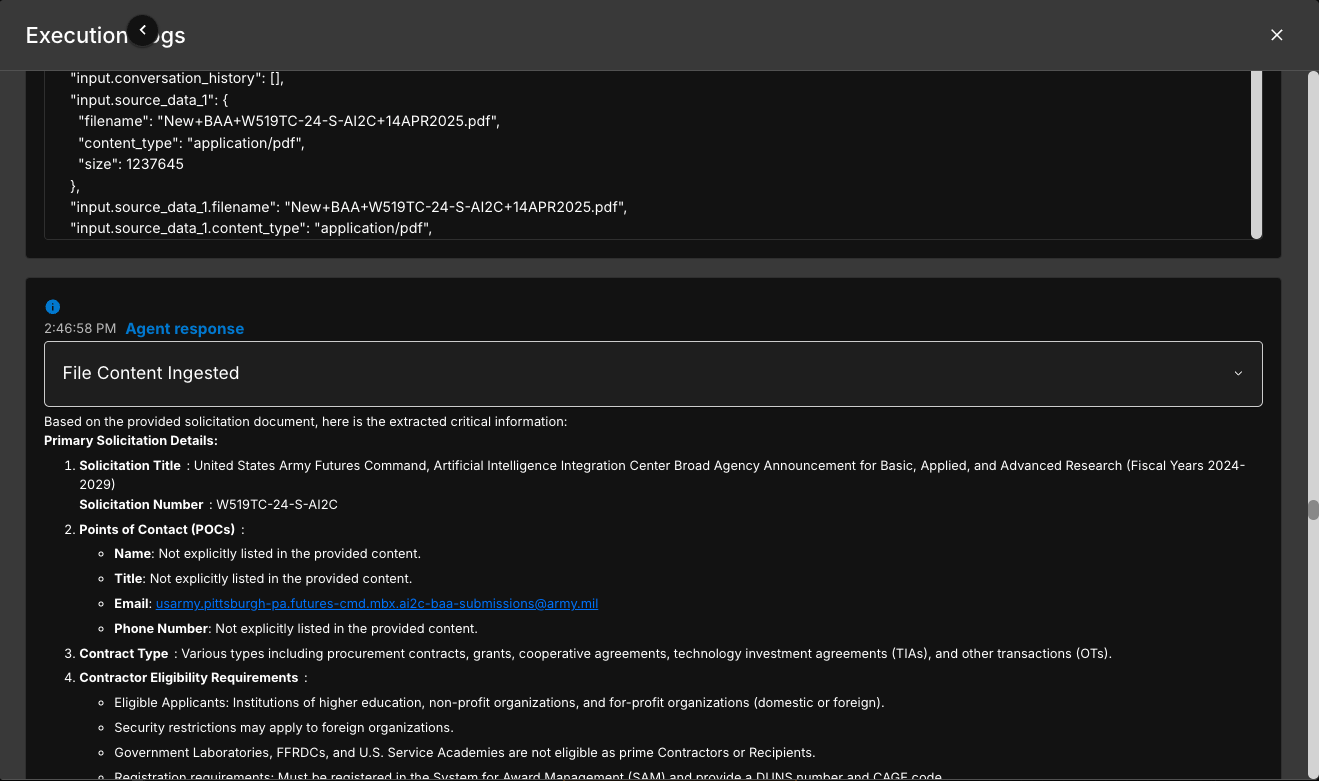
Step 6: Review the Output
Once execution completes, review the results in the execution logs on the right side panel.
Execution Logs (Right Side Panel)
The right side panel displays the Activity log showing the execution progress, completion status, and final output for each workflow node:
- workflow_started - Indicates the workflow has begun execution
- rfi_rfp_data_extraction - Shows "Started" then "Completed" for the first LLM node
- rfi_rfp_metadata - Variable assignment node status
- rfi_rfp_questionnaire - Second LLM node execution status
- rfi_rfp_analysis - Variable assignment for questionnaire results
- rfi_rfp_project_plan - Third LLM node generating the project plan
- event entries - Show detailed execution warnings or information about source data population
Each node will show its status as "Started" and then "Completed" as the workflow progresses. You can also access Previous Runs from the dropdown at the top to review past execution logs.

The Activity log shows the execution progress and status of each workflow node
The Execution Logs modal provides detailed information about each workflow step
Common Beginner Tips
Start Simple
- Begin with a 3-5 node workflow
- Add complexity gradually as you learn
- Test frequently as you build
Use Templates
- Explore pre-built workflow templates (Coming Soon)
- Modify templates to fit your needs
- Learn from existing examples
Name Things Clearly
- Give nodes descriptive names
- Use clear workflow titles
Save Often
- Save your work regularly
Test Incrementally
- Test after adding each major component
- Don't wait until the entire workflow is built
- Fix issues immediately when they appear
Common Mistakes to Avoid
Missing Connections
- Every node needs proper input/output connections
- Disconnected nodes won't execute
- Check for loose or missing connections
Incorrect Data Types
- Ensure output types match input expectations
- Use conversion nodes when needed
Missing Required Parameters
- Configure all required fields in each node
- Workflows won't run with missing requirements
Workflow JSON Export
If you encounter any issues building the workflow or want to see how the complete workflow should look, you can import this example JSON directly into Agent Builder. Use the Import feature to load this configuration:
This is the complete workflow configuration that matches the tutorial above. You can import this JSON to create the entire workflow automatically.
{
  "nodes": [
    {
      "id": "a9aea009-de53-4856-8479-8350104f115e",
      "type": "llm",
      "position": {
        "x": 110.43673959206248,
        "y": -1319.9453248055145
      },
      "config": {
        "file_variables": "input.source_data_1",
        "is_terminal": false,
        "live_search": 0,
        "model": "gpt-4.1-mini",
        "persona": 1,
        "temperature": 0.2,
        "prompt_template": "Please conduct a comprehensive review of the provided solicitation document and extract the following critical information:\n\n**Primary Solicitation Details:**\n\n1. **Solicitation Title** - Full official title and solicitation number\n2. **Points of Contact (POCs)** - Names, titles, email addresses, and phone numbers for all listed contacts\n3. **Contract Type** - (e.g., FFP, CPFF, T&M, IDIQ, etc.)\n4. **Contractor Eligibility Requirements** - Including business size standards, certifications (e.g., 8(a), SDVOSB, HUBZone), registration requirements (SAM.gov, CAGE code), and any other qualifying criteria\n5. **Scope of Work/Statement of Work** - Detailed description of required services or products\n6. **Period of Performance** - Base period duration with specific start/end dates if provided\n7. **Option Periods** - Number of option periods, duration of each, and conditions for exercise\n8. **Submission Deadline** - Date and time (including time zone) for proposal submission\n9. **Requiring Activity** - Agency, department, or office requesting the procurement\n10. **Submission Requirements** - Required format, page limits, number of copies, electronic vs. hard copy, and any mandatory templates or forms\n11. **Security Clearance Requirements** - Facility clearance level and personnel clearance levels required\n"
      },
      "label": "rfi_rfp_data_extraction",
      "key": ""
    },
    {
      "id": "64e8c839-b3b4-4fcc-ac97-36ec2b9e793d",
      "type": "variable_assignment",
      "position": {
        "x": 353.7554690090619,
        "y": -1172.8723188257104
      },
      "config": {
        "source": "rfi_rfp_data_extraction.response",
        "variable_name": "evaluation"
      },
      "label": "rfi_rfp_metadata",
      "key": ""
    },
    {
      "id": "72d456c8-b0ef-4deb-82e7-454bb6282d48",
      "type": "llm",
      "position": {
        "x": 617.3576644281344,
        "y": -1174.5799904213595
      },
      "config": {
        "file_variables": "input.source_data_1",
        "is_terminal": false,
        "live_search": 0,
        "model": "gpt-4.1-mini",
        "persona": 1,
        "temperature": 0.2,
        "prompt_template": "1. **Evaluation Criteria** - What factors will be used to evaluate proposals? (e.g., technical approach, past performance, price, small business participation) Include relative importance or weighting if specified.\n2. **Mandatory Requirements** - What are the \"go/no-go\" compliance requirements that could result in proposal rejection?\n3. **Key Milestones and Deliverables** - What are the critical delivery dates, performance milestones, and required deliverables throughout the contract period?\n4. **Budget/Funding Information** - Is there an estimated contract value, ceiling amount, or funding limitation disclosed?"
      },
      "label": "rfi_rfp_questionnaire",
      "key": ""
    },
    {
      "id": "e1e1d0c2-97ae-46f2-96af-f13c6a09acf4",
      "type": "variable_assignment",
      "position": {
        "x": 853.9245138504396,
        "y": -1178.6502335700566
      },
      "config": {
        "source": "rfi_rfp_questionnaire.response",
        "variable_name": "evaluation_questions"
      },
      "label": "rfi_rfp_analysis",
      "key": ""
    },
    {
      "id": "e7a7d627-b597-40ee-9a6e-aa86d74cb588",
      "type": "flat_response",
      "position": {
        "x": 726.5549219248967,
        "y": -892.1963473527438
      },
      "config": {
        "response_type": "text",
        "response_template": ",\n, \n"
      },
      "label": "Return Response",
      "key": ""
    },
    {
      "id": "3684d9f8-edc6-4f52-bf22-3159b5dc412e",
      "type": "llm",
      "position": {
        "x": 1116.4845766441988,
        "y": -1176.5930556908138
      },
      "config": {
        "file_variables": "source_data_1",
        "is_terminal": false,
        "live_search": 0,
        "model": "google-claude-45-sonnet",
        "persona": 1,
        "temperature": 1,
        "prompt_template": "Create a comprehensive RFI/RFP project plan to respond to the opportunity and generate a Gantt chart. Use Today's date as the start.\n# Requirements:\n1. **Include RFI/RFP project planning best practices and required milestones.**\n2. **Incorporate the following teams in the process:**\n- **Green Team:** Focuses on pricing and financial aspects, ensuring competitiveness and alignment with the client's budget. Identifies potential cost concerns and suggests pricing strategy adjustments.\n- **Yellow Team:** Reviews the proposal for clarity and completeness, highlighting gaps in information, areas for improvement, and sections that may not fully meet RFP requirements.\n- **Red Team:** Acts as a critical review group, identifying major issues or non-compliance with RFP criteria that could impact the proposal's viability.\n\n,\n\n\n"
      },
      "label": "rfi_rfp_project_plan",
      "key": ""
    },
    {
      "id": "3c52f320-fd8b-4047-bd5d-85af3ead0950",
      "type": "variable_assignment",
      "position": {
        "x": 1325.8426686663436,
        "y": -1169.4092293140811
      },
      "config": {
        "source": "rfi_rfp_project_plan.response",
        "variable_name": "project_plan"
      },
      "label": "RFI_RFP_Response_Timeline",
      "key": ""
    }
  ],
  "edges": [
    {
      "id": "xy-edge__a9aea009-de53-4856-8479-8350104f115eout-64e8c839-b3b4-4fcc-ac97-36ec2b9e793din",
      "source": "a9aea009-de53-4856-8479-8350104f115e",
      "target": "64e8c839-b3b4-4fcc-ac97-36ec2b9e793d",
      "sourceHandle": "out",
      "targetHandle": "in"
    },
    {
      "id": "xy-edge__72d456c8-b0ef-4deb-82e7-454bb6282d48out-e1e1d0c2-97ae-46f2-96af-f13c6a09acf4in",
      "source": "72d456c8-b0ef-4deb-82e7-454bb6282d48",
      "target": "e1e1d0c2-97ae-46f2-96af-f13c6a09acf4",
      "sourceHandle": "out",
      "targetHandle": "in"
    },
    {
      "id": "xy-edge__64e8c839-b3b4-4fcc-ac97-36ec2b9e793dout-72d456c8-b0ef-4deb-82e7-454bb6282d48in",
      "source": "64e8c839-b3b4-4fcc-ac97-36ec2b9e793d",
      "target": "72d456c8-b0ef-4deb-82e7-454bb6282d48",
      "sourceHandle": "out",
      "targetHandle": "in"
    },
    {
      "id": "xy-edge__e1e1d0c2-97ae-46f2-96af-f13c6a09acf4out-3684d9f8-edc6-4f52-bf22-3159b5dc412ein",
      "source": "e1e1d0c2-97ae-46f2-96af-f13c6a09acf4",
      "target": "3684d9f8-edc6-4f52-bf22-3159b5dc412e",
      "sourceHandle": "out",
      "targetHandle": "in"
    },
    {
      "id": "xy-edge__3684d9f8-edc6-4f52-bf22-3159b5dc412eout-3c52f320-fd8b-4047-bd5d-85af3ead0950in",
      "source": "3684d9f8-edc6-4f52-bf22-3159b5dc412e",
      "target": "3c52f320-fd8b-4047-bd5d-85af3ead0950",
      "sourceHandle": "out",
      "targetHandle": "in"
    },
    {
      "id": "xy-edge__3c52f320-fd8b-4047-bd5d-85af3ead0950out-e7a7d627-b597-40ee-9a6e-aa86d74cb588in",
      "source": "3c52f320-fd8b-4047-bd5d-85af3ead0950",
      "target": "e7a7d627-b597-40ee-9a6e-aa86d74cb588",
      "sourceHandle": "out",
      "targetHandle": "in"
    }
  ]
}